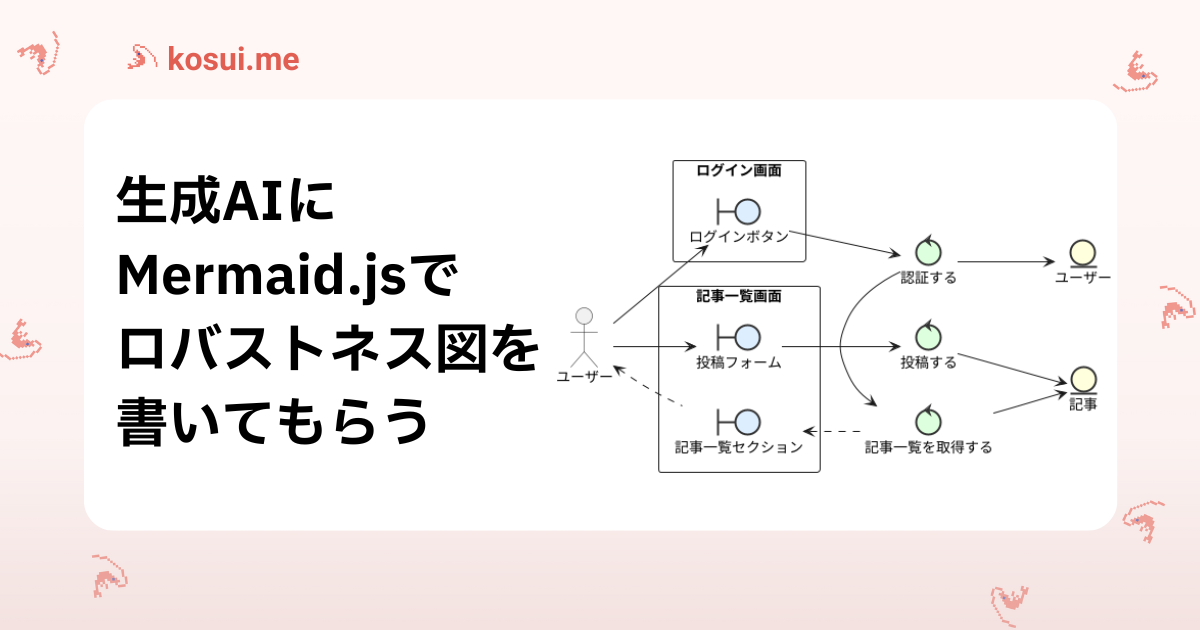
生成AIにMermaid.jsでロバストネス図を描いてもらう
背景
生成AIによる要求分析
要求分析はチームによるシステム開発の要であり、関係者の認識を揃えるために非常に重要なプロセスです。
システム開発のための要求分析の手法としてICONIXやRDRAなどが知られていますが、その過程ではユースケース図やロバストネス図などの図を用いてシステムの要求を視覚化することが一般的です。
近年では生成AIを使用することでより高速に要求分析を行うことができるようになりました。特に、自然言語で記述された抽象的な要望を生成AIに与え、要求を抽出させた上でPlantUMLやMermaid.jsなどで図を執筆させることで、プロジェクトの立ち上げ速度を向上させることができます。
例えば、「この要望から関係しうるアクターと外部システムをすべて列挙し、それぞれのアクターが持つ要望を3つ挙げて」と書くだけで、プロジェクト初期に巻き込むべきチームや関係者をすぐに発見できます。
ロバストネス図とは
ロバストネス図を通じて、ユースケースとドメインモデルが実際の画面やAPIでどのように用いられるか整理することで、ユースケースやドメインモデルの妥当性を検証できます。
以下は、PlantUMLで生成したロバストネス図の一つです。
ロバストネス図は、以下の3つの主要な要素で構成されています。
- バウンダリオブジェクト (Boundary Object)
例) 画面やAPIなど
ユーザーや外部システムとのインタフェースを表します。
- コントロールオブジェクト (Control Object)
例) 「認証する」「商品の一覧を取得する」などのユースケース
バウンダリオブジェクトとエンティティオブジェクトの間の仲介役として、システムの処理ロジックや制御の流れを表します。
- エンティティオブジェクト (Entity Object) 例) 「ユーザー」「商品」などの永続化されたデータ システムが扱う主要なデータや情報を表します。データベースやファイルストレージに永続化されることが一般的です。
目的
Mermaid.jsでロバストネス図を描画したい
PlantUMLにはロバストネス図の描画機能がありますが、Mermaid.jsにはありません。
しかし、Mermaid.jsはJavaScriptとCSSだけで描画を完結させることができるため、GitHubやNotion、esaなどの様々なサービス上で導入されています。
Mermaid.jsの他の機能を利用して、何が何でもMermaid.jsでロバストネス図を書いてみましょう。
手法
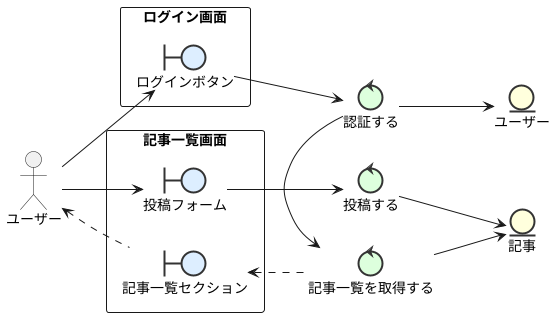
Mermaid.jsのフローチャートを用いたロバストネス図
Mermaid.jsの flowchart 機能を利用して、ロバストネス図を描画しました。
class を活用することで、バウンダリ・コントロール・エンティティの区別もしやすいと思います。
---
config:
  theme: redux
---
flowchart LR
    classDef boundary fill:#fff59d,stroke:#ffa000,stroke-width:2px;
    classDef control fill:#e3f2fd,stroke:#2196f3,stroke-width:2px;
    classDef entity fill:#e6ee9c,stroke:#4caf50,stroke-width:2px;

    actorUser["👤 ユーザー"]

    subgraph boundarySg["バウンダリ (画面と要素)"]
        direction LR

        subgraph loginView["🖥️ ログイン画面"]
            direction LR

            loginBtn["👆 ログインボタン"]
            loginBtn:::boundary
        end

        subgraph articleListView["🖥️ 記事一覧画面"]
            direction LR

            articleListSec["🖥️ 記事一覧
セクション"]
            articleListSec:::boundary

            postForm["👆 投稿フォーム"]
            postForm:::boundary
        end

    end

    subgraph controlSg["コントローラ"]
        direction LR

        authnCtrl["🔑 認証する"]
        authnCtrl:::control

        articleListCtrl["📜 記事一覧を
取得する"]
        articleListCtrl:::control

        postCtrl["📤 投稿する"]
        postCtrl:::control
    end

    subgraph entitySg["エンティティ"]
        direction LR

        user[("ユーザー")]
        user:::entity

        article[("記事")]
        article:::entity
    end

    actorUser --> loginBtn
    loginBtn --> authnCtrl
    authnCtrl --> user
    authnCtrl --> articleListCtrl
    articleListCtrl --> article
    articleListSec -.- articleListCtrl
    actorUser -.- articleListSec
    actorUser --> postForm
    postForm --> postCtrl
    postCtrl --> article
生成AIを用いたロバストネス図の生成
作成したロバストネス図を基に、Gemini 2.5 Flashに「記事削除機能」のロバストネス図を作成させます。
記事詳細画面から、「削除」ボタンを押して記事を削除する機能のロバストネス図を書いてください。なお、記事を削除できるのは、その記事を投稿したユーザーだけです。まず記事投稿者取得コントロールによって記事を投稿したユーザーを取得し、次に記事削除コントロールによって記事を削除してください。 なお、ロバストネス図は下記のテンプレートを参考にMermaid.jsで書いてください。 (後述するテンプレート)
その結果、以下のようなロバストネス図を得ることができました。これは概ね成功ではないでしょうか。
flowchart LR
    classDef boundary fill:#fff59d,stroke:#ffa000,stroke-width:2px;
    classDef control fill:#e3f2fd,stroke:#2196f3,stroke-width:2px;
    classDef entity fill:#e6ee9c,stroke:#4caf50,stroke-width:2px;

    actorUser["👤 ユーザー"]

    subgraph boundarySg["バウンダリ"]
        direction LR

        subgraph articleDetailView["🖥️ 記事詳細画面"]
            direction LR

            deleteButton["🗑️ 削除ボタン"]
            deleteButton:::boundary
        end
    end

    subgraph controlSg["コントローラ"]
        direction LR

        articleAuthorCtrl["👤 記事投稿者
取得コントロール"]
        articleAuthorCtrl:::control

        articleDeleteCtrl["🗑️ 記事削除
コントロール"]
        articleDeleteCtrl:::control
    end

    subgraph entitySg["エンティティ"]
        direction LR

        article[("記事")]
        article:::entity

        user[("ユーザー")]
        user:::entity
    end

    actorUser --> deleteButton
    deleteButton --> articleAuthorCtrl
    articleAuthorCtrl --> article
    articleAuthorCtrl --> user
    articleAuthorCtrl --> articleDeleteCtrl
    articleDeleteCtrl --> article
    articleDeleteCtrl --> articleDetailView:::boundary
flowchart LR
    classDef boundary fill:#fff59d,stroke:#ffa000,stroke-width:2px;
    classDef control fill:#e3f2fd,stroke:#2196f3,stroke-width:2px;
    classDef entity fill:#e6ee9c,stroke:#4caf50,stroke-width:2px;

    actorUser["👤 ユーザー"]

    subgraph boundarySg["バウンダリ (画面と要素)"]
        direction LR

        subgraph loginView["🖥️ ログイン画面"]
            direction LR

            loginBtn["👆 ログインボタン"]
            loginBtn:::boundary
        end

        subgraph articleListView["🖥️ 記事一覧画面"]
            direction LR

            articleListSec["🖥️ 記事一覧
セクション"]
            articleListSec:::boundary

            postForm["👆 投稿フォーム"]
            postForm:::boundary
        end

    end

    subgraph controlSg["コントローラ"]
        direction LR

        authnCtrl["🔑 認証する"]
        authnCtrl:::control

        articleListCtrl["📜 記事一覧を
取得する"]
        articleListCtrl:::control

        postCtrl["📤 投稿する"]
        postCtrl:::control
    end

    subgraph entitySg["エンティティ"]
        direction LR

        user[("ユーザー")]
        user:::entity

        article[("記事")]
        article:::entity
    end

    actorUser --> loginBtn
    loginBtn --> authnCtrl
    authnCtrl --> user
    authnCtrl --> articleListCtrl
    articleListCtrl --> article
    articleListSec -.- articleListCtrl
    actorUser -.- articleListSec
    actorUser --> postForm
    postForm --> postCtrl
    postCtrl --> article
付録
テンプレート
以下のテンプレートをコピペして利用してください。
---
config:
  theme: redux
---
flowchart LR
    classDef boundary fill:#fff59d,stroke:#ffa000,stroke-width:2px;
    classDef control fill:#e3f2fd,stroke:#2196f3,stroke-width:2px;
    classDef entity fill:#e6ee9c,stroke:#4caf50,stroke-width:2px;

    actorUser["👤 ユーザー"]

    subgraph boundarySg["バウンダリ (画面と要素)"]
        direction LR

        subgraph loginView["🖥️ ログイン画面"]
            direction LR

            loginBtn["👆 ログインボタン"]
            loginBtn:::boundary
        end

        subgraph articleListView["🖥️ 記事一覧画面"]
            direction LR

            articleListSec["🖥️ 記事一覧
セクション"]
            articleListSec:::boundary

            postForm["👆 投稿フォーム"]
            postForm:::boundary
        end

    end

    subgraph controlSg["コントローラ"]
        direction LR

        authnCtrl["🔑 認証する"]
        authnCtrl:::control

        articleListCtrl["📜 記事一覧を
取得する"]
        articleListCtrl:::control

        postCtrl["📤 投稿する"]
        postCtrl:::control
    end

    subgraph entitySg["エンティティ"]
        direction LR

        user[("ユーザー")]
        user:::entity

        article[("記事")]
        article:::entity
    end

    actorUser --> loginBtn
    loginBtn --> authnCtrl
    authnCtrl --> user
    authnCtrl --> articleListCtrl
    articleListCtrl --> article
    articleListSec -.- articleListCtrl
    actorUser -.- articleListSec
    actorUser --> postForm
    postForm --> postCtrl
    postCtrl --> article